


Common defects and their causes in stamping process
Stamping mold is a special process equipment that processes materials into parts (or semi-finished products) in stamping processing. Classify according to the nature of the process: punching die, bending die, deep drawing die, forming die, etc. Classification based on the degree of process combination: single process mold, composite mold, and progressive mold.
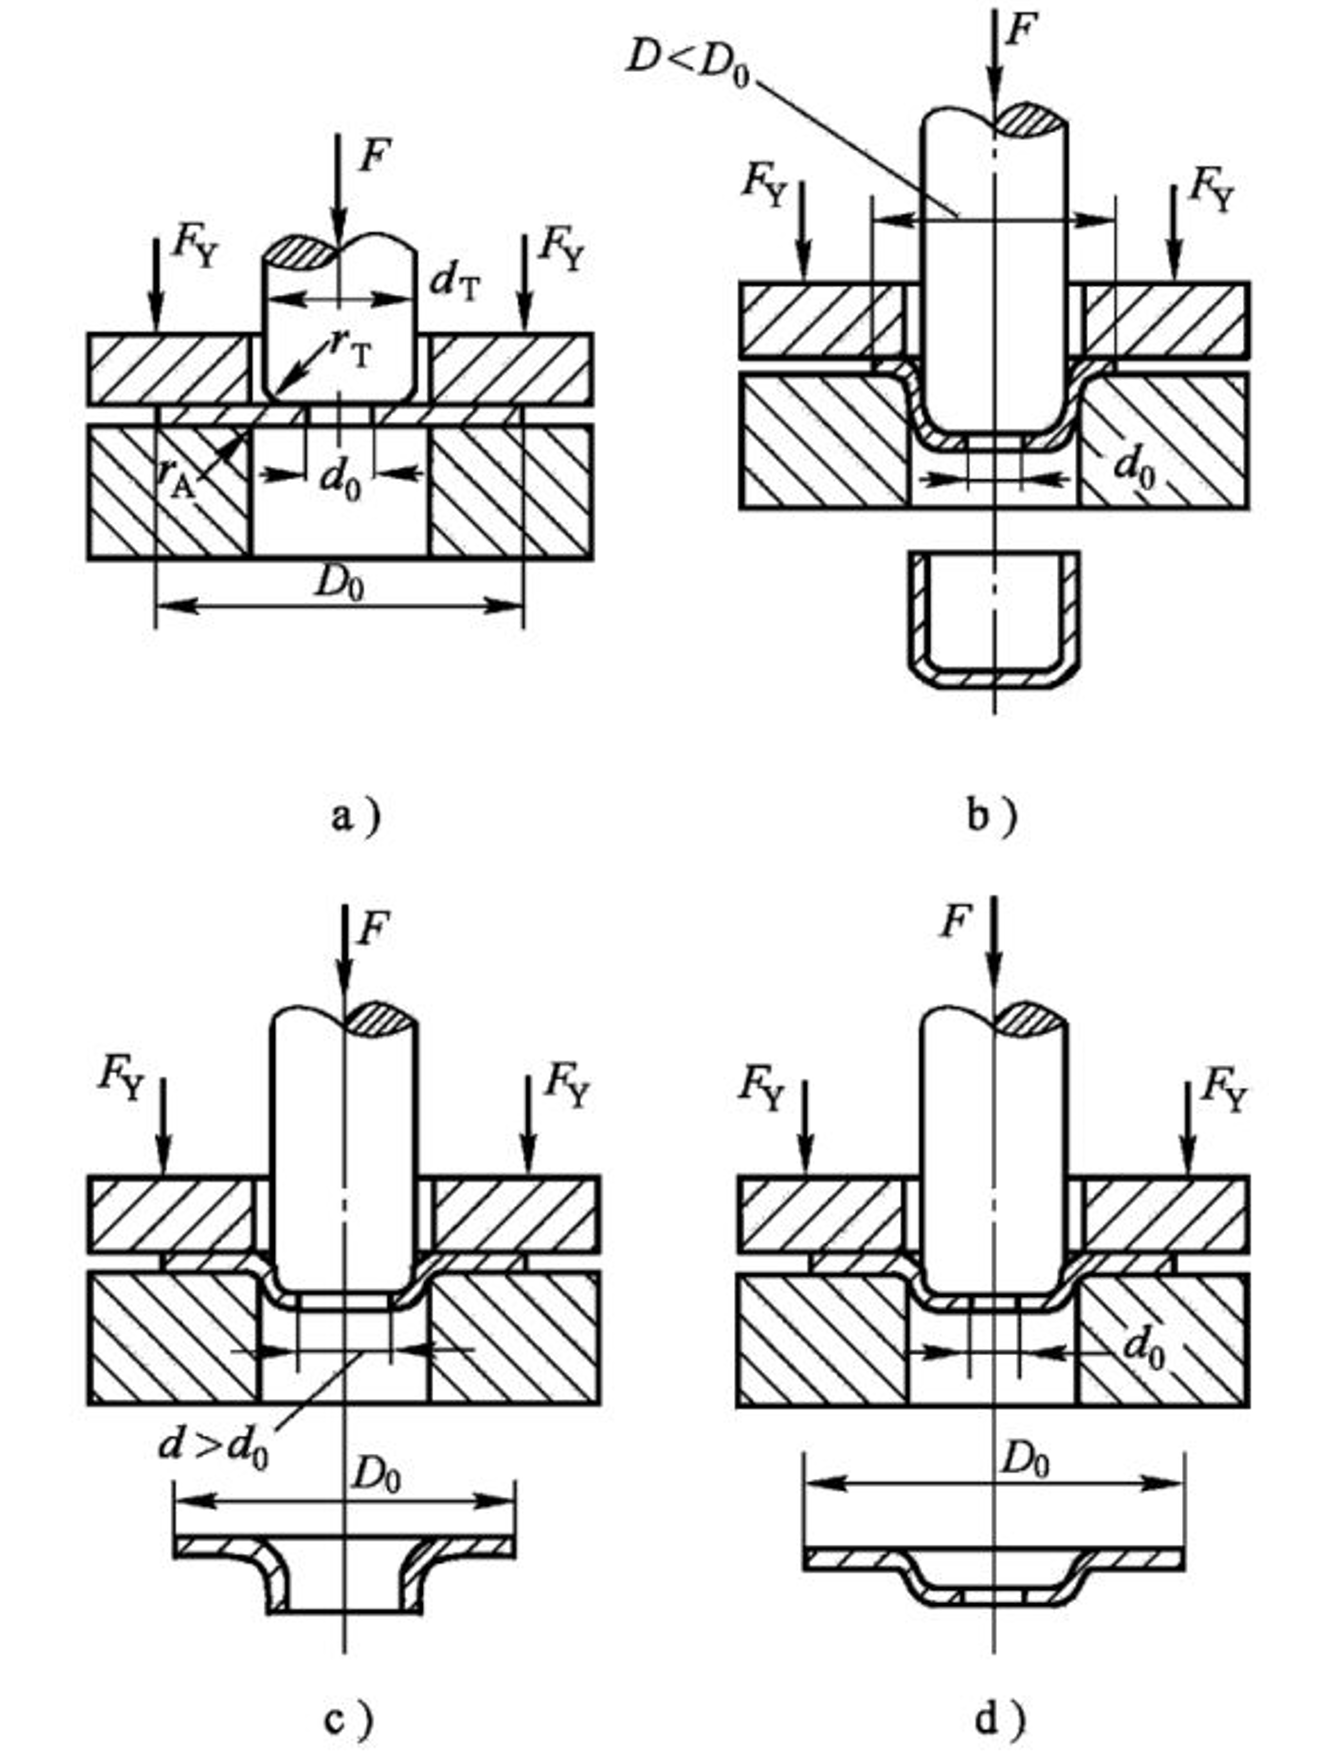
a) Forming die b) Drawing die c) Flanging die d) Bulging die
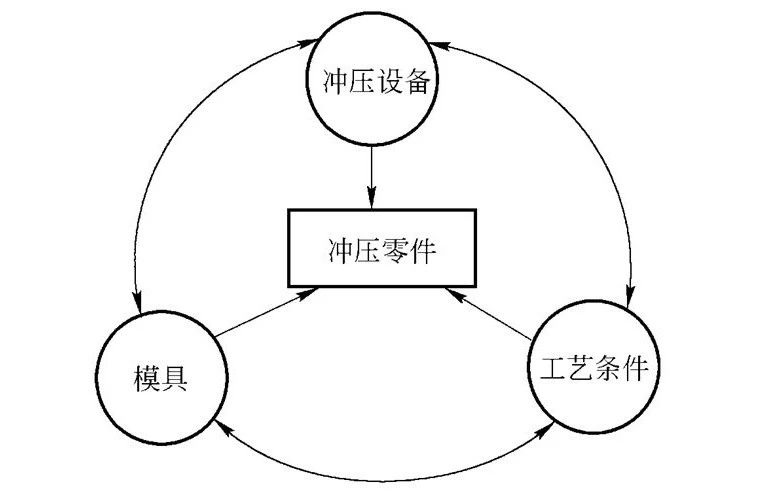
The three elements of stamping production: reasonable stamping process, advanced molds, and efficient stamping equipment.
1. Blanking, punching, and trimming
Defects: Excessive burrs, deformation, surface scratches, size mismatch, missing holes, etc
1) Excessive burrs: The gap between the convex and concave molds is too large or too small; Blade wear; Poor guidance accuracy; The positions of the convex and concave molds are not concentric.
2) Deformation: The hole spacing is too small; Poor fit between the pressure plate and the concave model surface; Excessive clearance, etc.
3) Surface scratches: there are phenomena such as dragging and pulling during operation; Scratches and other damages during the shearing process of the sheet metal.
4) Size mismatch: Inadequate feeding; Damaged or loose positioning device, position shifting, etc.
5) Less hole: the punch is broken; Insufficient punch length, etc.
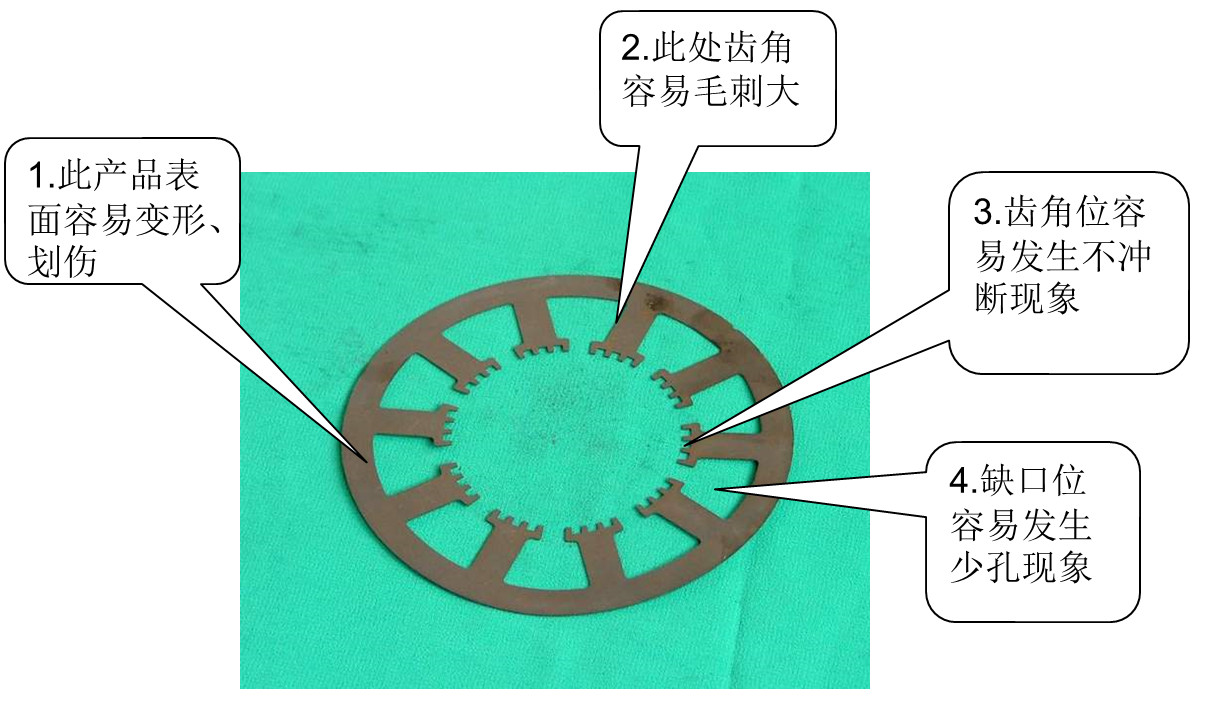
Defect locations are prone to occur in products such as cutting, punching, and trimming
2. Drawing
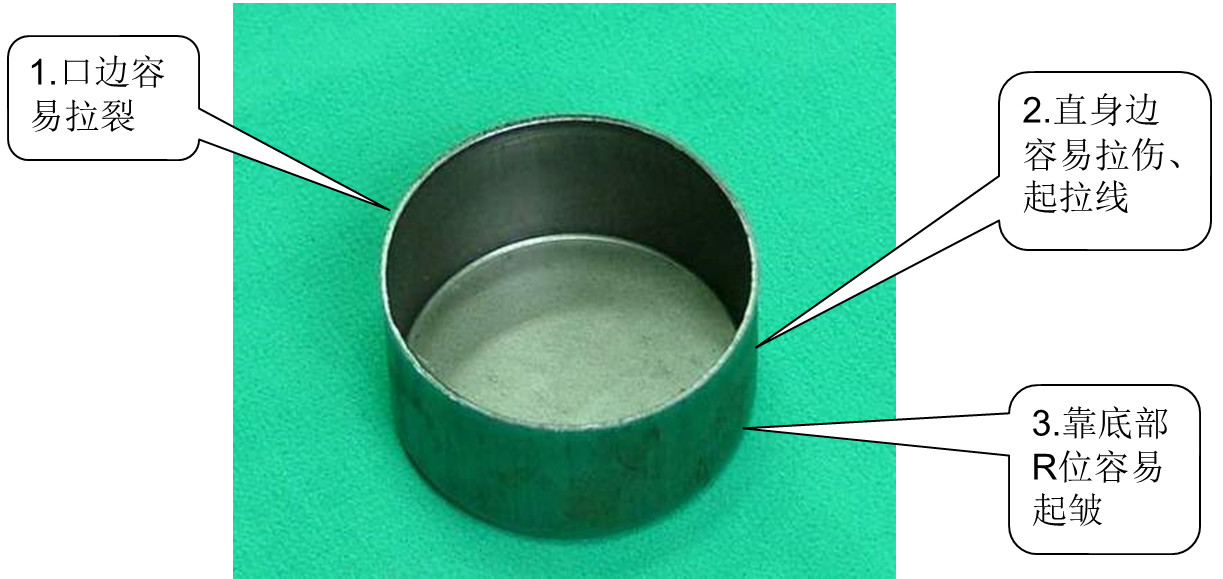
Drawn products are prone to defect locations
3. Flanging
Defects: Uneven flipping, inconsistent flipping height, rough flipping, cracked flipping, etc.
1) Uneven flipping: The gap between the convex and concave molds is too large.
2) Inconsistent flipping height: uneven gap between convex and concave molds; Inaccurate positioning; The size of the dropped parts is not accurate.
3) Flipping and roughening: There are scars on the blade edge; Impurities on the surface of the parts; The hardness of the cutting edge is too low.
4) Flanging and cracking: large burrs during edge trimming; The gap between the convex and concave molds is too small; The shape of the flipped edge has a sudden change.
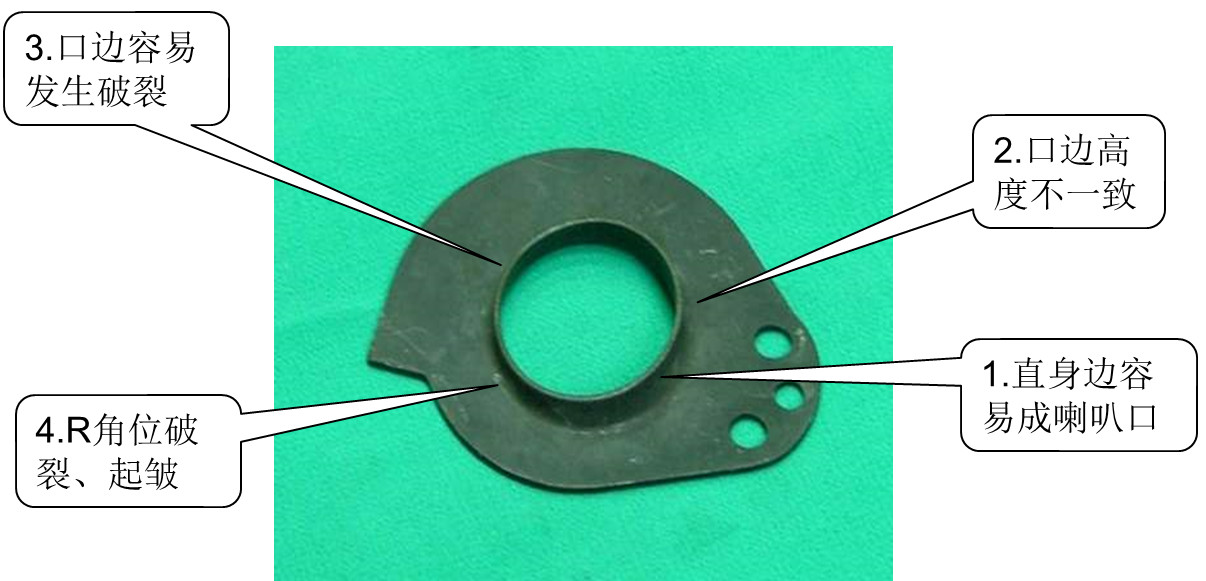
Flapped products are prone to defect locations
4. Bending
Defects: Unqualified bending angle, cracked bending edge, steps at the bend R corner, etc.
1) Unqualified bending angle: The gap between the convex and concave molds is too large, and the matching angle between the convex and concave molds does not match. The thickness of the plate material is uneven.
2) Broken bending edge: The gap between the convex and concave molds is too small; The bending angle is too small; Excessive punching force and fast speed; The board material is slightly hard.
3) Bending R angle with steps: the bending angle of the convex and concave molds is too large; Excessive external R angle; The bending force is too small.
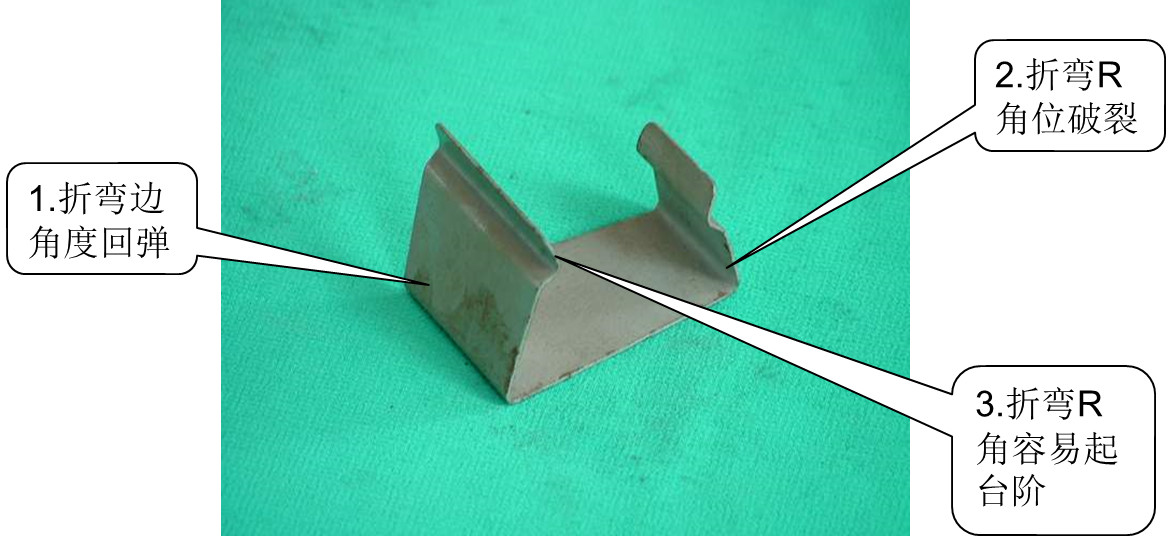
The location where defects are prone to occur in bent products
5. Scrap jumping hole
1) The length of the punch is not enough. Insert the punch into the concave mold according to the cutting edge of the punch and add 1mm to replace the punch;
2) The gap between the concave molds is too large. Cut in the mold to reduce the gap or use a coating machine to reduce the gap;
3) If the punch or template is not demagnetized, use a demagnetizer to demagnetize the punch or template.
6. Waste blockage
1) Small or misaligned discharge holes increase the discharge holes to ensure smooth discharge;
2) The material hole has chamfers, increase the size of the material hole to remove the chamfer;
3) The cutting edge is not tapered, and the line cutting taper or the opposite side expansion hole reduces the length of the straight wall position;
4) The straight wall position of the blade is too long, and drilling on the opposite side shortens the straight wall position of the blade;
5) The blade edge collapsed, causing a sharp edge, resulting in material blockage and re grinding the blade edge.
7. Poor appearance
1) The blade edge collapsed, causing the blade to become too large and regrind the blade edge;
2) The gap between the punch and the die is too large, and the wire is cut into the block and the gap is re matched;
3) The smoothness of the concave die blade is poor, and the polished blade edge is in a straight wall position;
4) The gap between the punch and the die is too small, save the die and adjust the gap;
5) The top material force is too large, pull out the blade in reverse to replace the spring and reduce the top material force.
8. Uneven trimming
1) Positioning offset adjustment positioning;
2) There is unilateral molding, increasing the material pulling and pressing force, and adjusting the positioning;
3) Design error, resulting in uneven tool connection and re cutting edge inserts;
4) Feeding is not allowed to adjust the feeder;
5) There is an error in the calculation of the feeding step. Recalculate the step and reposition the tool position.
9. The punch is prone to breakage
1) The closing height is too low, and the cutting edge of the punch is too long. Adjust the closing height;
2) Improper material positioning caused the punching punch to cut one side, and the positioning or feeding device to break due to uneven force;
3) The waste material from the lower mold blocks the cutting edge, causing the punch to break and re drilling a large feeding hole to ensure smooth feeding;
4) Repair or re cut the fixed part (clamp) of the punch with the guide part to make the punch move up and down smoothly (strike the plate) offset;
5) Poor board guidance caused the punch to be subjected to unilateral force and the gap between the boards to be repaired;
6) The punch blade is too short, which interferes with the punching plate and replaces the punch, increasing the length of the blade part;
7) The punch is not fixed properly, and if it moves up and down, it should be re fixed to prevent it from moving up and down;
8) The punch blade is not sharp and needs to be re ground;
9) The surface of the punch is scratched and subjected to uneven force during material removal. Replace the punch again;
10) The punch is too thin, too long, and the strength is not enough. Change the punch type again;
11) The hardness of the punch is too high, and the material of the punch is incorrect. Replace the punch material and adjust the heat treatment hardness.
10. Iron filings
1) Recalculate the position of the reinforcement or bending position due to misalignment of the reinforcement;
2) If the bending gap is too small, squeeze out the iron filings to readjust the gap, or grind the formed block or grind the formed punch;
3) The bending convex mold is too sharp to repair the R angle;
4) If there is too little material for the cutting edge, re connect the cutting edge;
5) The pressure bar is too narrow and needs to be ground again.
11. Poor sprouting
1) The center of the bud bottom hole does not coincide with the center of the bud punch to determine the correct center position, or move the position of the bud punch, or move it to the pre punching position of bud edge high edge low or even rupture, or adjust the positioning;
2) Uneven gap between concave molds, resulting in low or even broken gaps between sprouts, high edges, and edge repair sprouts;
3) The sprouting bottom hole does not meet the requirements, resulting in sprouting height and recalculating the bottom hole aperture, increasing or decreasing diameter deviation of pre punched holes, and even cracking.
12. Poor molding
1) The forming die convex die is too sharp, causing material to crack. The forming convex die should be trimmed with an R angle, and the cutting edge should be appropriately trimmed with an R angle;
2) The length of the forming punch is not sufficient, resulting in the inability to calculate the correct length of the punch and adjust the actual length of the punch to meet the forming requirements;
3) The forming punch is too long, causing deformation of the material at the forming point. It is important to determine the correct length of the punch and adjust the actual length of the punch to meet the requirements until it fractures;
4) Insufficient material at the forming site causes tensile cracking. Calculate the unfolding material, or repair the R angle or reduce the forming height;
5) Poor positioning, causing molding defects. Adjust the positioning or feeding device;
6) The forming gap is too small, causing tearing or deformation, and adjusting the gap.
13. Bending dimensions
1) The angle error caused by the mold not being adjusted in place leads to size deviation, poor closing height, or poor angle difference;
2) Insufficient elasticity causes poor angle, resulting in dimensional deviation and spring replacement;
3) The material does not meet the requirements, resulting in poor angle and size replacement or readjustment of gap deviation;
4) The deviation of material thickness causes angle defects, resulting in size deviation. The material thickness is determined, and the material is replaced or the gap difference is readjusted;
5) Improper positioning leads to size deviation. Adjusting the positioning makes the size OK;
6) Design or processing errors result in intermittent welding and grinding between bent public assembly blocks, eliminating the gaps between the blocks and resulting in small bending dimensions;
7) The forming public does not have an R-angle, and under normal circumstances, the bending height of the forming public repair R-angle is too small;
8) The bending dimensions on both sides are too large for compression reinforcement;
9) Unilateral bending and pulling cause size instability, increase spring force, adjust positioning;
10) Unreasonable gaps, causing poor angles and dimensional deviations, repair gaps;
11) The height of the folding knife is not enough, and the bending punch is too short to fit into the folding knife. This increases the height of the folding knife, causing the bending punch to fit into the position of the folding knife as much as possible, resulting in more adverse angles;
12) When bending, the speed is too fast, causing deformation at the root of the bending. Adjust the speed ratio and choose a reasonable speed;
13) The structure is unreasonable, and the folding knife is not inserted into the fixed template. When re milling the groove and inserting the folding knife into the template for stamping, the gap becomes larger;
14) The hardness of the formed male heat treatment is not sufficient, resulting in breakage of the pressure line or flattening of the re formed male pressure line.
14. No discharge
1) Improper positioning or feeding adjustment of positioning or feeding devices;
2) Insufficient avoidance, grinding and avoidance;
3) The internal guide pillar is damaged, causing poor board making activity. Replace the internal guide pillar;
4) Replace the punch if it is pulled or the surface is not smooth;
5) Reasonably rearrange the position of the top material pin;
6) Insufficient top material force or insufficient stripping force, replace the top material spring or stripping spring;
7) The coordination between the punch and the clamp plate is not smooth, and repairing the punch and clamp plate makes the coordination between the punch and the clamp plate smooth;
8) If the formed slider does not fit smoothly, adjust the slider and guide groove to make them fit smoothly;
9) Inappropriate heat treatment during plate making, deformation after stamping for a period of time, re grinding and plate making to correct deformation;
10) If the punch is too long or the length of the top material pin is not enough, increase the length of the top material pin or replace it with a punch with a suitable length;
11) Replace the punch when the punch is broken;
12) The template is not magnetized, and the workpiece is brought up to demagnetize the template.
15. Unsmooth material delivery
1) The mold is not properly aligned, resulting in the material belt not being in the same straight line as the feeder and the mold being re aligned or the feeder being adjusted;
2) Leveling machine or material replacement for uneven belt adjustment;
3) Non unloading causes uneven feeding, refer to non unloading solutions;
4) Adjust the positioning too tightly;
5) Adjust the guide pin if it is too tight or if the straight wall position is too long;
6) If the punch is not fixed properly or is too long and interferes with the material belt, replace it with a suitable length punch and re fix it;
7) The top material pin is too short, causing interference between the material belt and the formed block. Adjust the length of the top material pin to avoid interference;
8) Improper arrangement of the floating block position and adjustment of the floating block position.
16. Poor riveting
1) Improper closing height of the mold, inadequate riveting, and adjustment of the closing height;
2) The workpiece is not in place, and the positioning deviation is adjusted;
3) Before riveting, if the workpiece is defective, confirm the sprout hole. Refer to the solution for the sprout hole defect to confirm whether the riveting hole is chamfered. If there is no chamfer, increase the chamfer;
4) If the length of the riveting punch is not enough, replace it with a punch with a suitable length;
5) Confirm that the riveting punch does not meet the requirements and use a riveting punch that meets the requirements.
17. Missing or installed
1) Careful and wrong punching during accidental assembly;
2) Punches without directional markings are marked with directional punches.
18. Incorrect screw installation
1) Not knowing the thickness of the template, knowing that the thickness of the template is too long or too short;
2) Not careful enough and inexperienced enough to choose appropriate screws.
19. Disassembly and assembly of molds
1) If the pin hole is not wiped clean, the pin hole and pin should be wiped clean. When disassembling the mold, the positioning pin should be removed first. If it is easy to damage the mold, screws should be used to guide it first, and then the positioning pin hole should be drilled;
2) Do not damage the pin hole when the installation and disassembly of the mold program is incorrect and the pin is dropped.
20. Positioning pin
1) When the hole wall is roughened or scratched, causing too tight assembly of the mold, carefully check whether the pin hole is roughened, otherwise the pin hole that cannot be drilled should be re reamed;
2) If the pin hole is offset or there is no escape hole below, add a positioning pin escape hole.
21. Spring too long
1) Not paying attention to measuring the depth of the spring hole, calculating the compression amount of the spring, and reselecting it cannot be pressed down;
2) Not careful enough, lack of experience, suitable spring bottom dead center.


